Files & Folders
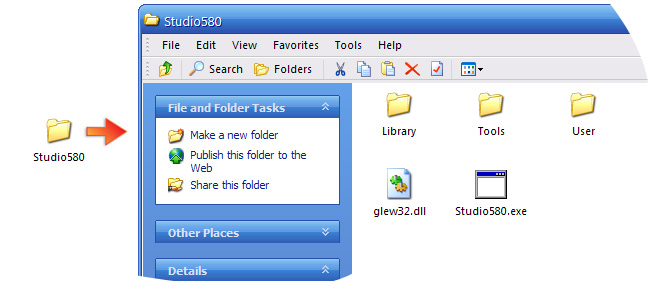
Certain files and folders are repeatedly mentioned in the Studio580 documentation. The names and relative locations of these oft-mentioned files and folders are shown in the figure below, which illustrates the directory structure of a freshly unpacked Studio580 distribution.
The roles of these elements are as follows:
Program Folder—shown at left; contains all other files and folders. Right now, this folder has no special purpose. In the future, however it may serve as a staging area during the installation of readymade brush kits (see the “Improved Brush Packaging” section on the Future Directions Page for more information).
Library Folder—contains low-level system files and is “look-but-don’t-touch” area. If you are interested in the inner workings of Studio580, the GLSL source files for all of the GPU shaders are stored here. They are plain text files and can be opened in any editor.
Tools Folder—contains the Brush Cartographer application, which is used in the creation of new brushes, as described in the Brush Creation Guide.
User Folder—contains source image and similarity map files for brushes that you install yourself. Note that while Studio580 permits you to place these files anywhere in your filesystem, it is highly recommended that you put them here.
User Interface Elements
Studio580 follows Microsoft’s user interface guidelines, uses standard Win32 UI widgets, and employs an interface layout and naming scheme similar to other applications. In short: the Studio580 user interface is straightforward and is almost completely self-explanatory.
Furthermore, almost all of the UI controls whose functions aren’t self-explanatory are concentrated in the Brush Options dialog box. This dialog box is illustrated in the figure below, and its elements and their roles are discussed in the paragraphs that follow.
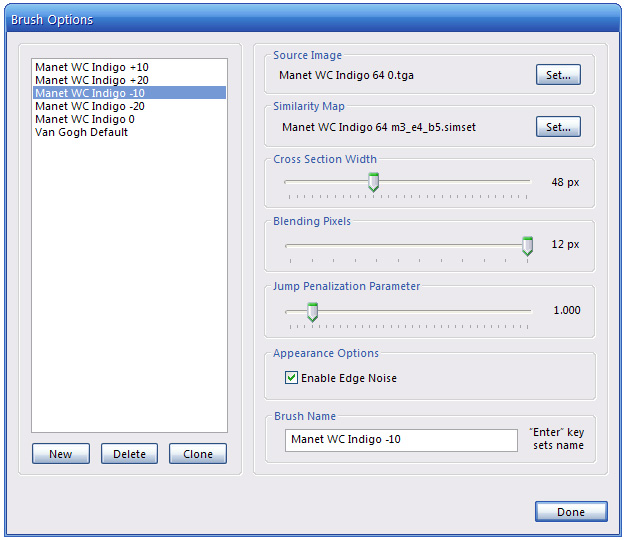
Brush List—this is the large list box control that appears at the left of the dialog box. It lists all of the brushes available in your Studio580 installation and highlights whichever brush is currently selected. Most importantly, all of the other controls in the dialog box affect only the currently selected brush.
New—creates a new brush object and automatically selects it as the current brush in the brush list. New brushes are created as clones of Studio580’s built-in default brush. However, newly created brush objects are not very useful until they’ve been customized by the user so as to incorporate a user-provided source image and similarity map. See the Brush Creation Guide and the Readymade Brush Installation Guide for more information about creating and installing source images and similarity maps.
Delete & Clone—these buttons perform the named operation on whichever brush object is currently selected in the brush list. There is an annoyance and workaround involved with deleting brushes; see the “Deleting Brushes and Support Files” section of the Problems, Annoyances, & Workarounds Guide for more information. Brush cloning is often used to create families of related brushes, as described in the “Source Image Transformation” section on page 2 of the Tips & Tricks Guide.
Source Image—clicking the “Set...” button in this region will open a file chooser window, allowing you to choose a new source image file for whichever brush object is currently selected in the brush list. For a discussion of source images and how they’re created, see the “Preparing the Source Image” section of the Brush Creation Guide.
Similarity Map—clicking the “Set...” button in this region will open a file chooser window, allowing you to choose a new similarity map file for whichever brush object is currently selected in the brush list. For a discussion of similarity map files and how they’re created, see the “Creating the Similarity Map” section of the Brush Creation Guide.
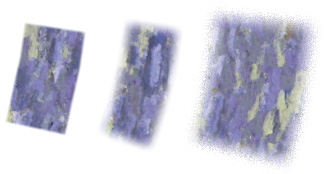
Cross Section Width—controls how thick the strokes drawn with the current brush are. In the illustration below, the left and center strokes have the same cross section width, which is smaller than the cross section width of the center stroke.
Blending Pixels—controls how many pixels along a stroke edge are progressively blended into the surroundings. In the illustration below, the left and center strokes have the same cross section width, but the center stroke has more blending pixels than does the stroke on the left.
Jump Penalization Parameter—controls the “smoothness” of synthesized texture information. This esoteric control can have a profound effect on the visual quality of the strokes Studio580 produces. To learn how to manipulate it, see the discussion on page 4 of the Tips & Tricks Guide.
Enable Edge Noise—when checked, the edges of strokes made with the current brush are feathered with Perlin-like noise. In the illustration below, edge noise is disabled on the left and center strokes and enabled on the stroke at right. Because edge noise obscures transitions between strokes when one stroke is laid atop another, it is very useful when layering strokes to create various effects. When noise is enabled, it is generated in the blending pixels, so the intensity of its effects are increased or decreased with the number of blending pixels.