Source Image Transformation
Studio580 allows you to paint in a style similar to that seen in a source image you provide. Of course, by furnishing different source images, you can paint in radically different styles. However, you can also paint in different variations on the same style. You do this by using an image processing tool to subtly alter your source image while leaving other brush parameters the same. The Studio580 user interface provides several controls that make this process relatively easy. Furthermore, provided the alterations you make to your source images aren’t that drastic and don’t involve convolutions with large supports (i.e. > 3 × 3 pixels), you can share one single similarity map among a large number of source images that have all been transformed from the same precursor. This technique is illustrated in the following figure.
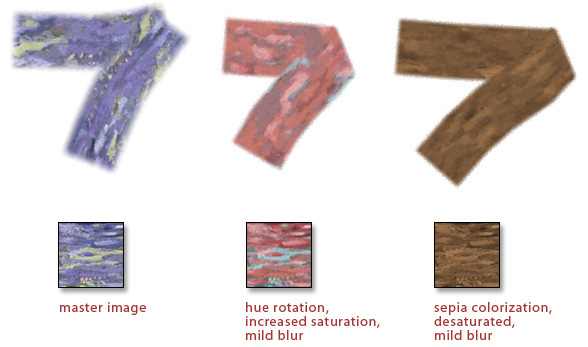
At the left of the figure, an original, master source image and a stroke generated from it are shown. Various image processing operations were then applied to the original source image to produce new source images. These new source images were then used generate strokes. The new source images and strokes generated from them are shown at center and at right, along with a description of how they’ve been altered from the original.
You can transform your own source images through the same technique as follows:
- Assume that you have a brush installed in Studio580 called my “My Brush,” and you want to produce a variation on it. For the purposes of this example, let’s say that source image for My Brush is stored in the TARGA file “MyBrushSource.tga.”
- Open MyBrushSource.tga in your favorite image editing application and apply whatever transformations you’d like.
- Save the transformed image to a new file. Let’s say in this case that you transformed the original image by rotating its hue. So you decide to save the transformed image as “MyBrushSourceHueRotated.tga.” What you call the new image’s file doesn’t matter. What does matter is that you don’t change the size of the image when you transform it, that you save it to a new file (i.e. you don’t overwrite the original source file), and that you save it in 24-bit Truevision TARGA format.
- Switch to Studio580 and open the Brush Options dialog box. For a picture of what this dialog box looks like on screen and a discussion of the controls in it, see the “User Interface Elements” section of the Quick Tour.
- In the brush list, select the name of the original brush that you’re using as a basis for your new, transformed brush—in this case, you’ll select “My Brush.”
- With “My Brush” selected in the brush list, click the “Clone” button. A new brush, named “My Brush Clone” will appear in the brush list and automatically become selected. This new brush is identical in every way to the brush from which it was cloned.
- Change the name of your new brush to something more descriptive. To do so, click in the text edit box in the “Brush Name” section of the dialog box, delete the old name, and type in a new name. Then press [ENTER] to set the new name. In this case, we’ll rename our brush from “My Brush Clone” to “My Brush Hue Rotated.”
- Make sure that “My Brush Hue Rotated” is currently selected in the brush list, and click the “Set...” button under the “Source Image” section. A file chooser box will open.
- In the file chooser box, navigate through your filesystem and choose the transformed source image that you saved earlier from your image editing application (in this case, you’re choosing “MyBrushSourceRotated.tga”).